Some Background …
At Pelmorex, we don’t shy away from innovation and experimenting with new technologies. Once such technology is Flutter. Flutter is a framework developed by Google for creating cross platform mobile applications for iOS, Android, and even Web! Google defines it as a “…UI toolkit for building beautiful, natively compiled applications for mobile, web, and desktop from a single codebase.”
At Pelmorex, we use Flutter within our existing iOS and Android “The Weather Network” apps to present users with a screen where they can subscribe for notifications.
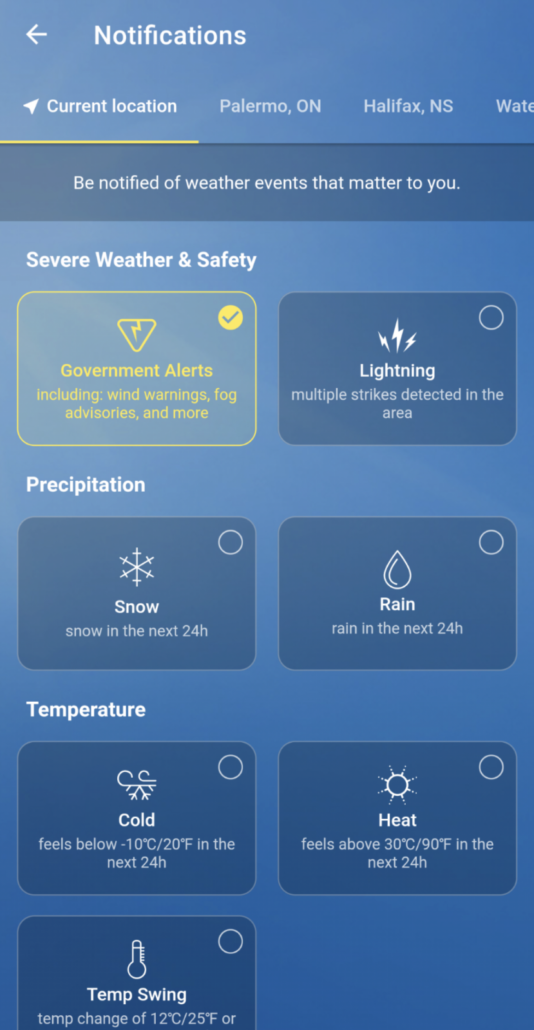
This screen is exactly the same on both apps so much of the development work was done only once. The integration into the apps, of course, has to be done for each platform. I’m going to walk you through how it was integrated into our Android app.
Android Integration
Integrating a single Flutter screen into an app is not particularly difficult. You can follow the steps here to get started: https://flutter.dev/docs/development/add-to-app/android/project-setup. You’ll see there are 2 options for bringing the Flutter project into the Android project. We went with option A, depending on the AAR using Gradle. We actually took it a bit further; we upload the Flutter project’s AARs to Artifactory and then import them using Gradle in our Android project. This way, a developer doesn’t actually need the Flutter code to run the Android project.
After that’s done, there are a handful of ways you can actually display the Flutter screen in your Android code described here: https://flutter.dev/docs/development/add-to-app/android/add-flutter-screen?tab=cached-engine-with-initial-route-kotlin-tab. We decided to use FlutterView as it gives us fine-grained control over the FlutterEngine. We also use multiple routes in the Flutter project, which allows us to support different features written in Flutter using the same FlutterEngine. I’ll get into those details later on. For now, here’s how we set up the FlutterView:
val engine = FlutterEngine(context)
engine.dartExecutor.executeDartEntrypoint(DartExecutor.DartEntrypoint.createDefault())
engine.navigationChannel.pushRoute(“featureRoute”)

val channel = MethodChannel(engine.dartExecutor.binaryMessenger, “myMethodChannel”)
val flutterView = FlutterView(this, FlutterSurfaceView(this, true))
findViewById<ViewGroup>(R.id.flutterViewContainer).addView(flutterView)

flutterView.attachToFlutterEngine(engine)
- The
MethodChannelis used to communicate with the Flutter screen - “featureRoute” is the route you want to navigate to on the Flutter end
In addition to this, you’ll need to make sure you’re handling the engine’s lifecycle events by calling the following functions at the appropriate times:
engine.lifecycleChannel.appIsResumed()engine.lifecycleChannel.appIsPaused()engine.lifecycleChannel.appIsDetached()flutterView.detachFromFlutterEngine(engine)
Challenges
The greatest challenge that we were faced with was that we need to call some of our Flutter code from other screens of our app. So even when there’s no Flutter UI, we still need to be able to communicate with Flutter. We were able to do this by creating a separate MethodChannel and a separate route. The trick here is that the route used to communicate with no Flutter UI still needs to create a Flutter widget. Here’s what the code for that widget looks like:
class EmptyWidget extends StatefulWidget {
 @override
 State<StatefulWidget> createState() => EmptyViewState();
}

class EmptyViewState extends State<EmptyWidget> {
 final MethodChannel _methodChannel = MethodChannel("myBackgroundMethodChannel");

 @override
 void initState() {
   _methodChannel.setMethodCallHandler((call) => {
     // Handle incoming function calls
   });
   super.initState();
 }

 @override
 Widget build(BuildContext context) {
   return Container(color: Colors.transparent);
 }
}
And as part of the main widget:
routes: {
 '/': (BuildContext context) => EmptyWidget(),
 '/featureRoute: (BuildContext context) => FeatureWidget()
}
Now I can create a MethodChannel on the Android side with the same name: “myBackgroundMethodChannel”. As long as we’re on the default route, we can communicate with the Flutter code at any time. We use this to create notification toggles elsewhere in the app even if the Flutter screen is not present.
The use of Flutter started off as an experiment for us, but now that it’s being used within an iOS and Android app, we’re really starting to see it’s potential. It’s improved a lot since it’s early days, especially when adding to an existing app. If you haven’t given it a shot, I’d recommend you do!
