Introduction
When development of our new mobile web site began, we identified a number of goals that we wanted to achieve to ensure we were deploying the best experience to our users.
One of our goals was to automate a fail-safe way to continuously deploy new versions of the application, receive real-time feedback about application performance, user experience and either roll the application out to all users or cancel the deployment altogether.
We settled on an open source project called Spinnaker for our application deployment to our production clusters.
Spinnaker at Pelmorex Corp
Spinnaker is a very flexible tool with many ways to configure it to work with different tech stacks. At Pelmorex, we use spinnaker to deploy to multiple Kubernetes clusters, both on-premise and in the cloud.
Our deployments across clusters are both synchronized and atomic. We configure Spinnaker stages with dependencies to wait for stages across clusters before proceeding; and if any of the stages fail the new version will not be deployed to any of the clusters.
Our CI/CD process for web applications
We use Bitbucket for our version control, Jenkins for our CI pipeline, Artifactory to hold different versions of our applications and Kubernetes to run our applications in a scalable environment.
Here is what happens when new code is pushed to the master branch:
- The Jenkins pipeline start to execute different stages:
- Run tests
- Build a Docker image
- Publish the Docker image to Artifactory
- Publish a Helm Chart for the application to Artifactory
- Deploy the application to integration and staging environments
- Produce an artifact containing information about the current build
- The Spinnaker pipeline starts and executes stages:
- Use the Jenkins artifact to pull the Helm Chart from Artifactory
- Produces a new Helm Chart with config map values filled in
- Deploys the new version (canary) to the cluster and switches a portion of traffic to it
- Analyses real-time metrics between production and canary
- Calculates a score and determines whether the new version is acceptable
- Deploys the new version to the cluster and switches all traffic to the new version
Objective
The objective of this guide is to show one strategy for setting up Spinnaker to deploy canary and production versions of your application.
This post presumes you already have a CI pipeline, use Helm Chart, publish to Artifactory and run your application on a Kubernetes cluster with Istio
Spinnaker Configuration
A list of commands used to configure spinnaker to support the entire process that follows. Commands below use halyard – spinnaker’s command line tool used to configure instances of spinnaker.
Kayenta
hal config canary enable
- Will enable spinnaker’s kayenta module
hal config canary prometheus enable
- Considering we use Istio’s Prometheus, we required prometheus enabled as a canary backend
hal config canary prometheus account add ACCOUNTNAME --base-url PROMETHEUS_URL
- This is repeated for each kubernetes cluster available
hal config canary google enable
- Enables canary analysis and GCP integration
hal config canary google account add ACCOUNTNAME --project GCP_PROJECT --json-path GCP_KEY_LOCATION --bucket GCP_STORAGE_BUCKET
- Configures authentication to GPC
hal config canary google edit --gcs-enabled true
- Enables canary configuration and runs to be persisted outside of spinnaker in google
Jenkins
hal config ci jenkins enable
- Will enable Jenkins-Spinnaker integration
hal config ci jenkins master add ACCOUNTNAME --address JENKINS_URL --password JENKINS_PWD --username JENKINS_USERNAME
- Authentication into jenkins from spinnaker, pro tip – use a service account
Helm Repo
hal config artifact helm enable
- Considering that we use helm as a means to deploy to kubernetes, we need to enable helm as an artifact repository
hal config artifact helm account add ACCOUNTNAME --repository HELM_REPO_URL --username REPO_USERNAME --password REPO_PWD
- Authentication into helm repo from spinnaker
Setting Up the Spinnaker Pipeline
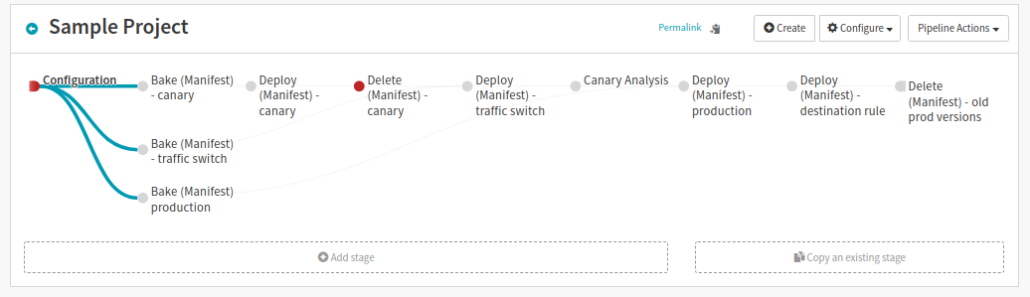
Application deployment in Spinnaker is made up of a number of stages within a single pipeline. Below is an outline of what we’ve done in each stage.
Configure
In this stage, we required Spinnaker to start it’s pipeline once the Jenkins pipeline of our application is completed. The Jenkins pipeline would produce an artifact that contains information about the build (version, dns and environment); this information is then pulled into Spinnaker and used to obtain a Helm Chart used for deploying canary and production applications.
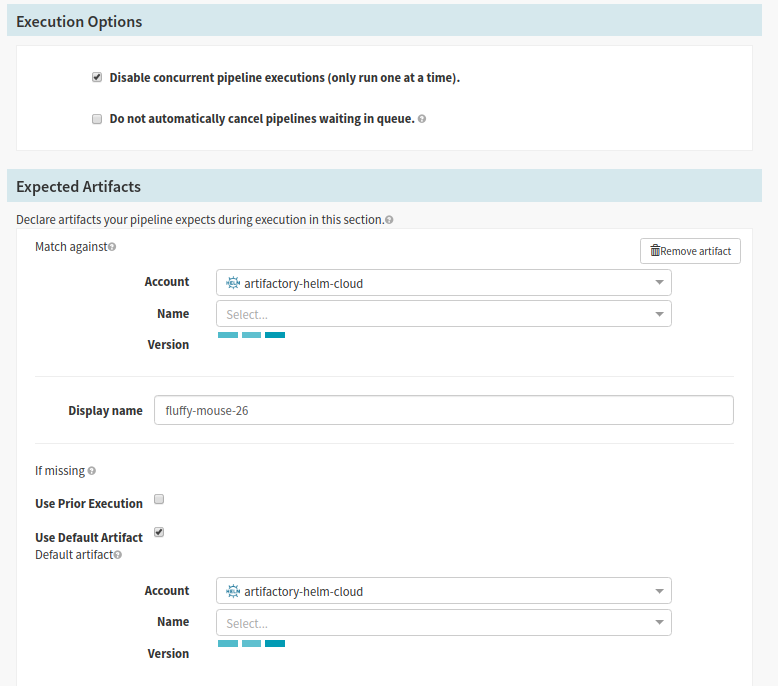
- In the Execution options section, you may check ‘Disable concurrent pipeline executions’, this will ensure that at any given time you will only have a single rollout happening
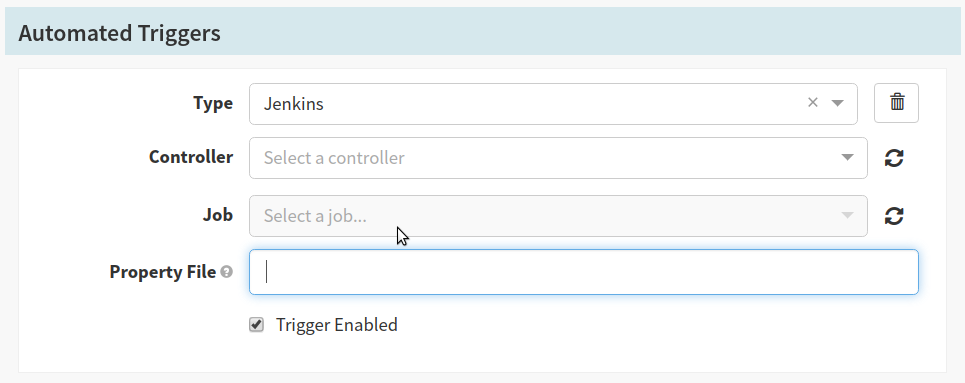
- The ‘Automated Trigger’ section provides options to select ways to automatically start your Spinnaker pipeline. At Pelmorex we use a Jenkins trigger. The Jenkins pipeline produces a JSON artifact containing information about the current build; once the pipeline execution is complete Spinnaker will start it’s own pipeline. See the Triggers topic in the docs
- Select Jenkins from the ‘Type’ selector
- Select
jenkins-masterfrom the ‘Controller’ selector - Select the Jenkins job path for your application in the ‘Job’ selector
- Enter the name of the Jenkins artifact in the ‘Property File’ text field. Note: this needs to match the property file your jenkins build creates
- Enable the trigger
- The ‘Expected Artifacts’ section allows you to specify a requirement for this stage. At Pelmorex we configured the ‘Use Default Artifact’ section to pull a specific version of the Helm Chart.
- Select the name of the expected artifact (needs to match the ‘Display Name’ in the ‘Automated Trigger’ section)
- Select the application name from the ‘Name’ selector
- Enter a name in the ‘Display Name’ text field. The name will be referenced in subsequent stages
- Check the ‘Use Default Artifact’ checkbox
- Select the helm registry account name configured in spinnaker from the ‘Account’ selector
- Select the application name from the ‘Name’ selector
- Use a Helper Properties Syntax to input the version from the trigger. Note: this will ensure that upon trigger you are pulling in the helm chart packaged specifically for this build
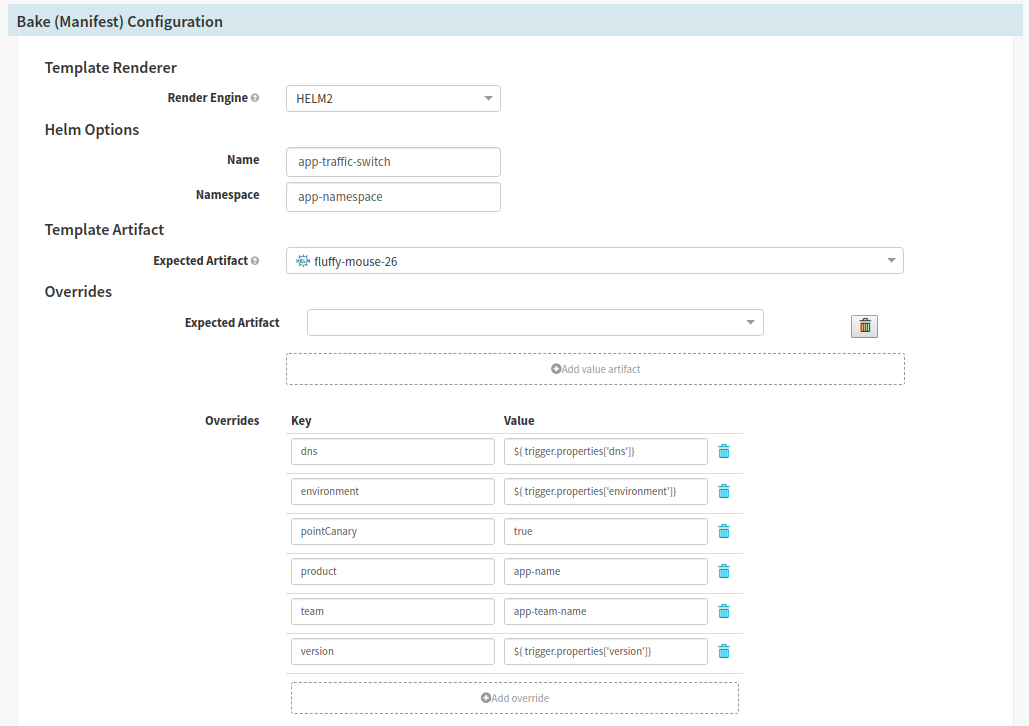
Bake Manifest
Spinnaker stage type: Bake (Manifest)
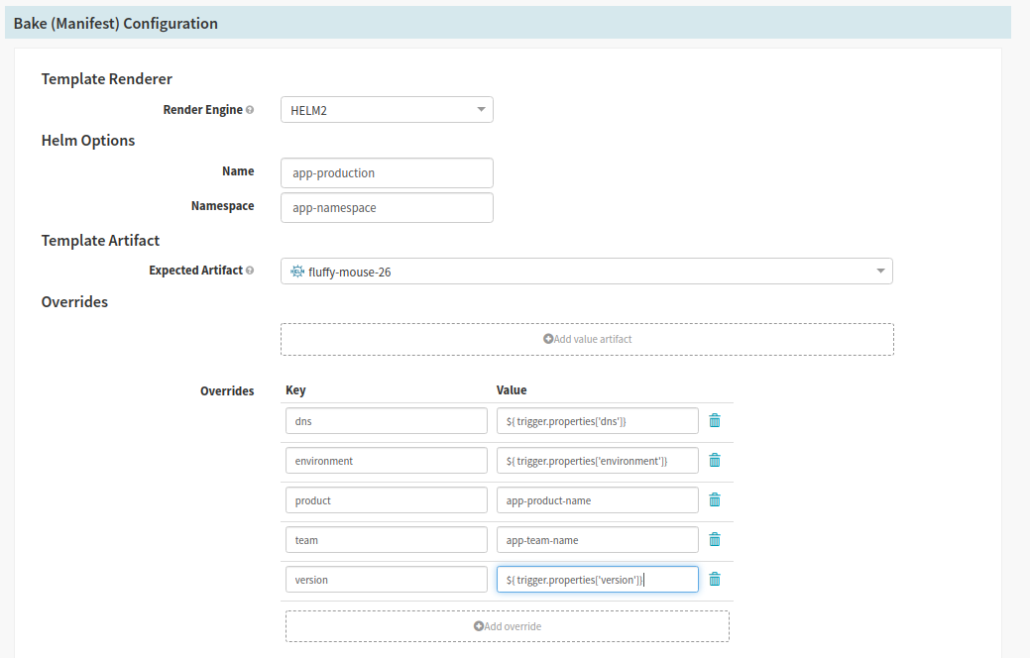
The Bake step uses the Helm Chart from the Configure step and produces a Kubernetes Manifest and is used in multiple steps.
We have three different streams starting with the Bake stage. One stream to deploy production pods, one to deploy canary pods and another stream to deploy the helm chart to switch user traffic to canary. The helm chart accepts a variety of variables and produces different manifests supporting all three states of deployment.
Production, Canary and Switch User Traffic streams mostly use the same settings
- In the Bake (Manifest configuration section):
- Select the version of Helm from the ‘Render Engine’ selector
- Provide a name and namespace for the deployment in the text fields
- Select the artifact created during the configuration stage from the ‘Expected Artifact’ selector
- In the ‘Overrides’ section we take the values from the Jenkins trigger (see Helper Properties Syntax and inject the variables into the Helm Chart; as our charts are written with variable substitution to change things like dns, environment, product, version, etc)
- For the Canary Stream
- We inject a value used to identify, via name and labels in the chart, the deployment as a canary

- For the Switch User Traffic Stream
- At Pelmorex we use Istio to deploy Virtual Services with specific routing rules. In this stream, we inject a value into our chart so that a Virtual Service that contains rules to route a subset of use traffic to the canary pods.
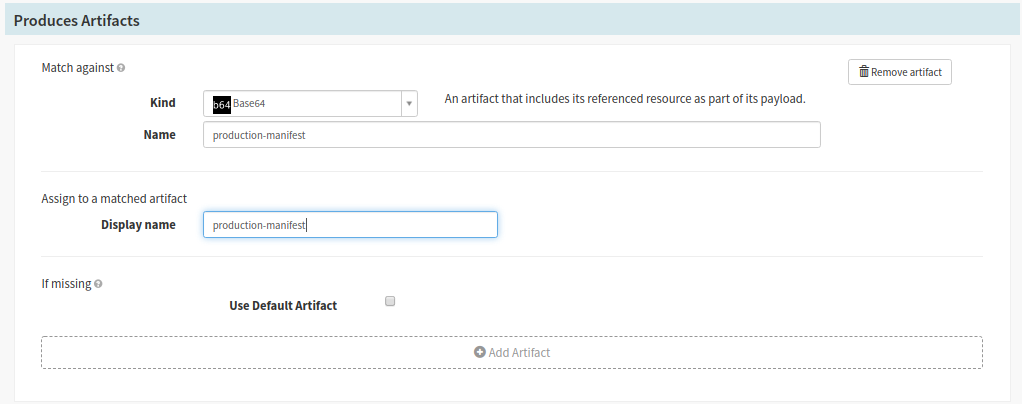
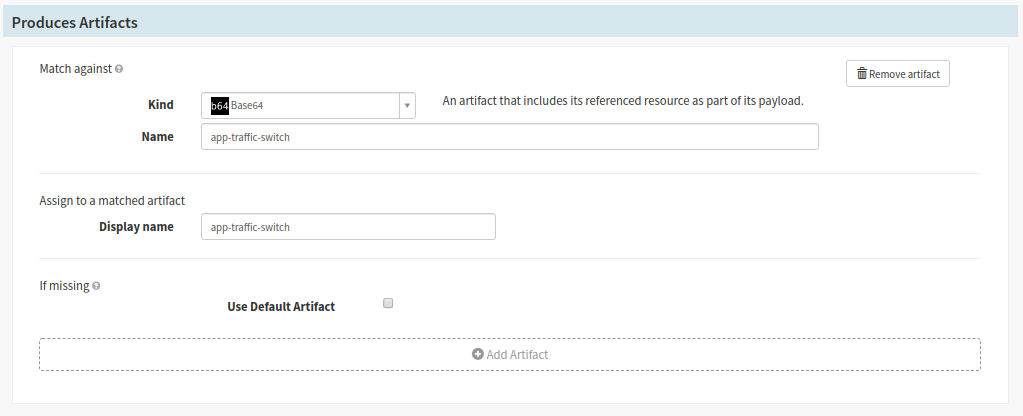
- The ‘Produced Artifact’ section will generate a kubernetes manifests from your chart to use in further stages of the pipeline
- Select base65 for the ‘Kind’ selector
- For the Production Stream
- Provide a manifest name in the ‘Name’ text field (ex production-manifest)
- Use the same name in the step above for the ‘Display Name’ text field
- For the Canary Stream
- Provide a manifest name in the ‘Name’ text field (ex canary-manifest)
- Use the same name in the step above for the ‘Display Name’ text field
- For the Canary Stream

- For the Switch User Traffic Stream
- Provide a manifest name in the ‘Name’ text field (ex service-traffic-switch)
- Use the same name in the step above for the ‘Display Name’ text field
- For the Switch User Traffic Stream
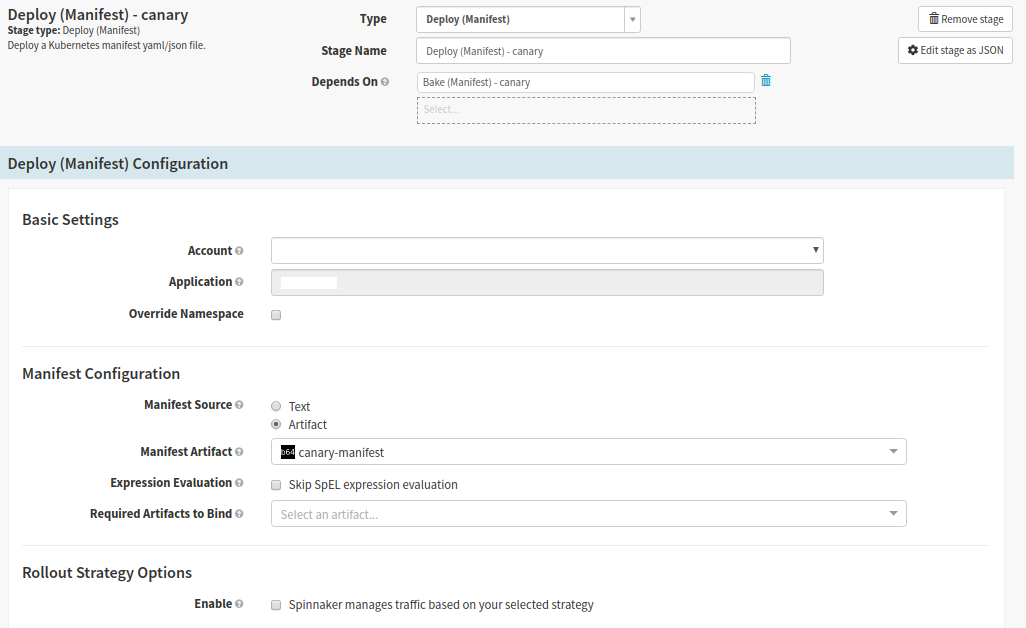
Deploy Canary pods
Spinnaker stage type: Deploy (Manifest)
In this stage we deploy the built version of the application to the cluster
- Select the Bake Canary stage and click ‘Add Stage’
- Set Depends On the Bake Canary stage
- In the ‘Basic Settings’ section we select the cluster we are deploying to
- In the ‘Manifest Configuration’ section
- Set the ‘Manifest Source’ to the artifact produced in the Bake Canary stage
Select the name of your manifest from the ‘Manifest Artifact’ – It should match the ‘Display Name’ from the Bake Canary stage
Delete old canary pods
Spinnaker stage type: Delete (Manifest)
To ensure users traffic is routed to the correct canary pod (the one deployed with your latest version of the app), we need to remove the old canary versions. At Pelmorex we use version as one of the labels for our pods; the version number is made up of the application version plus the Jenkins build number. In addition, the version label gives us a distinction between old and latest.
In this stage we want to delete anything that does not match the recently deployed canary.
- Select Deploy Canary stage, then click ‘Add Stage’
- Set Depends On to Deploy Canary pods
- In the Manifest section
- This is heavily dependent on how you have built your charts. The screenshot is an example that is pertinent to how we at Pelmorex have set it up.
- Select the cluster to delete from
- You may use other criteria such as a combination of ‘Kinds’ and ‘Labels’ filter older canary pods
- In the ‘Settings’ section, check the checkbox labeled ‘Cascading’ to eliminate having orphaned resources

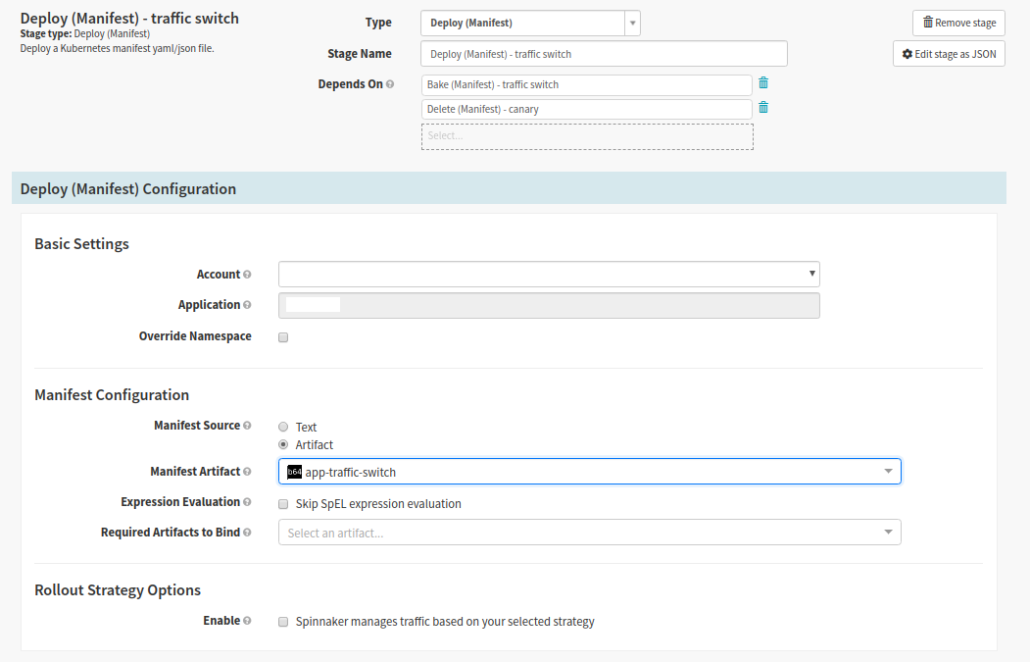
Switch User Traffic
Spinnaker stage type: Deploy (Manifest)
The Switch User Traffic stage deploys a Virtual Service (because we use Istio) that is used to route a portion of user traffic towards the canary version of the application. At Pelmorex we have logic in the Helm Chart to read header cookies for a key value pair identifying the user as a canary user.
- Select Bake Traffic Switch stage, then click ‘Add Stage’
- Set Depends On to Delete old Canary pods and Bake (Traffic Switch)
- In the ‘Basic Settings’ section we select the cluster we are deploying to
- In the Manifest Configuration section
- Set the ‘Manifest Source’ to Artifact
- Select the name in the ‘Manifest Artifact’ drop down – It should match the ‘Display Name’ from the Bake Traffic Switch stage
Canary Analysis
Spinnaker stage type: Canary Analysis
Canary Analysis stage gathers real-time metrics from both production and canary applications; and compares the results between the two versions. The results are given a threshold and overall score to determine whether the new version is acceptable to be deployed to all users.
See The Canary Judge for more information on the analysis phase.
- Select Switch User Traffic stage, then click ‘Add Stage’
- Set Depends On to Switch User Traffic
- For the ‘Analysis Config’ section, have a look at Best Practices for Configuring Canary as this section of the config can differ quite a bit depending on your application and analysis needs.
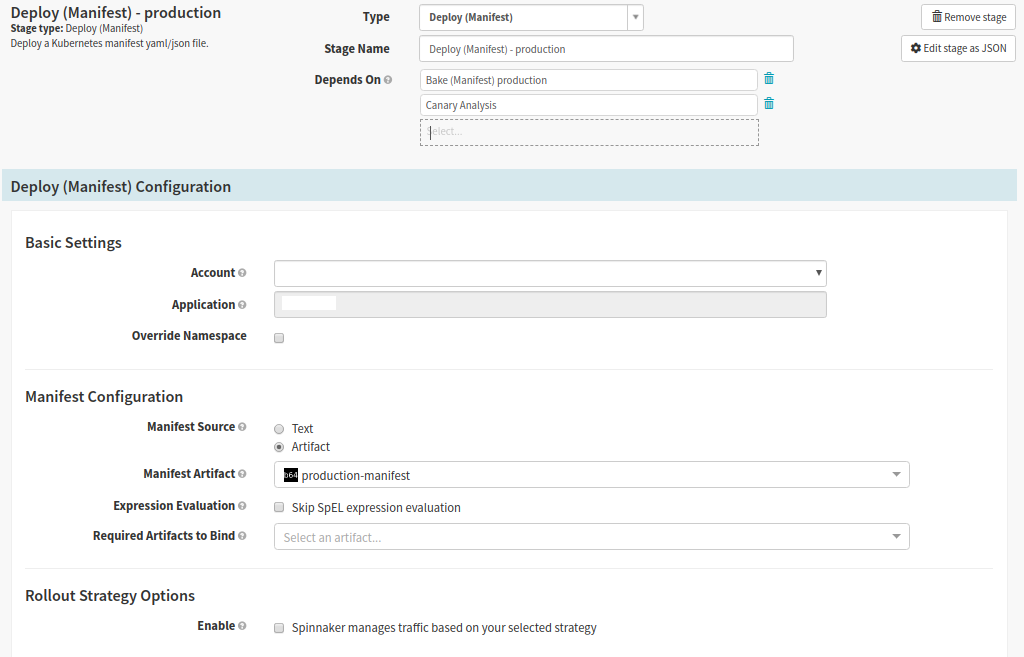
Deploy to Production
Spinnaker stage type: Deploy (Manifest)
Deploy to production stage deploys the current version of the application. This deployment excludes labels identifying it as a canary version, since the previous steps have identified the version as acceptable for production.
- Select Bake Production stage, then click ‘Add Stage’
- Set Depends On to Bake (Production), Canary Analysis
- In the ‘Basic Settings’ section we select the cluster we are deploying to
- In the ‘Manifest Configuration’ section
- Set the ‘Manifest Source’ to Artifact
- Select the name in the ‘Manifest Artifact’ drop down – It should match the ‘Display Name’ from the Bake Production stage
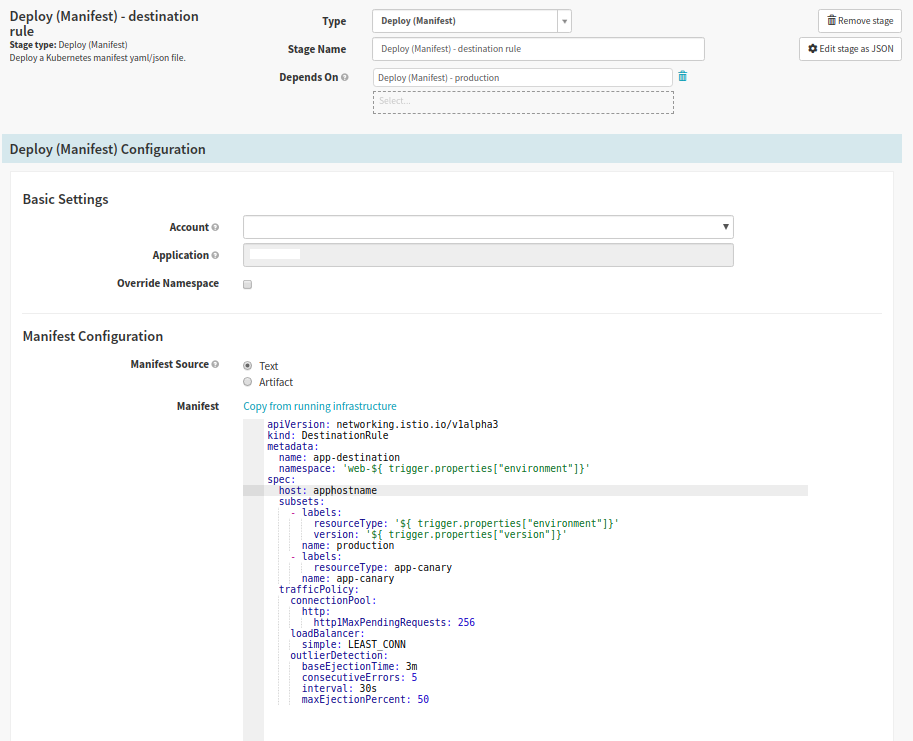
Deploy Destination Rule
Spinnaker stage type: Deploy (Manifest)
This stage will differ depending on your setup. Because we use Istio, in this stage we deploy a DestinationRule to route all user traffic to the deployed production version in a blue-green fashion.
- Select Deploy to Production stage, then click ‘Add Stage’
- Set Depends On to Deploy to Production
- In the ‘Basic Settings section’ we select the cluster we are deploying to
- In the ‘Manifest Configuration’ section we set the Manifest Source to text
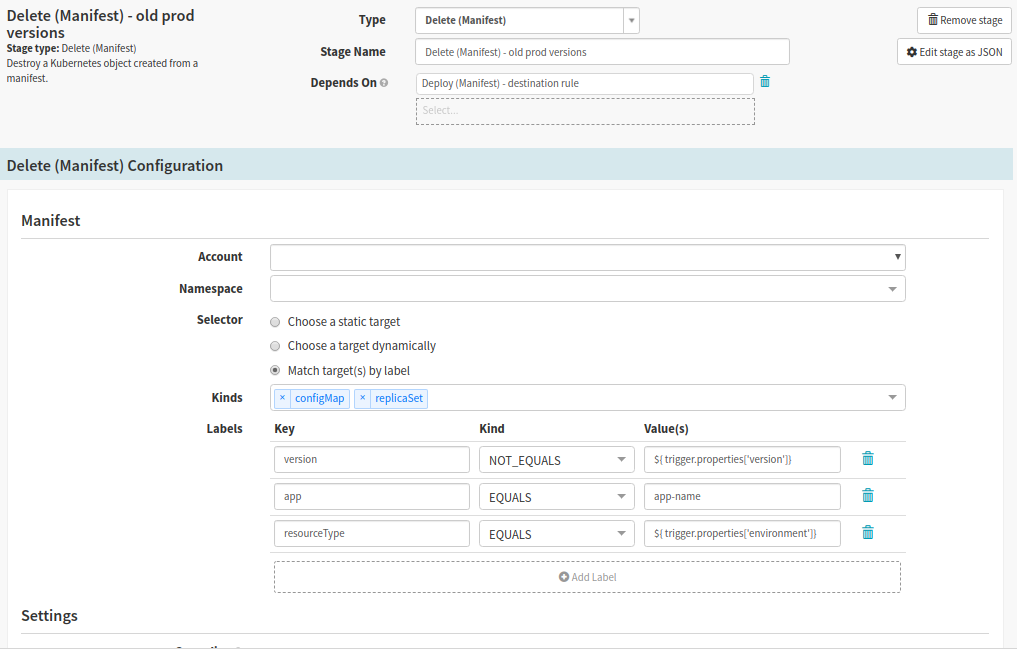
Clean Up Old Versions
Spinnaker stage type: Delete (Manifest)
The Clean up old versions stage removes previous versions of the application. At Pelmorex we added a Manual Judgement stage before we clean up old production versions; as it gives us a window of time to identify if the build worked successfully. The manual step makes it possible to stop the build and switch traffic back to the old version, if an error was found.
Similarly to the Delete Canary Pods stage our setup was due this way because of our use of Istio.
- Select Deploy Destination Rule stage, then click ‘Add Stage’
- Set Depends On to Deploy Destination Rule
- In the Manifest section
- Select the cluster to delete from
- This is heavily dependent on how you have built your charts. The screenshot is an example that is pertinent to how we at Pelmorex have set it up.
- Select the cluster to delete from
- You may use other criteria such as a combination of ‘Kinds’ and ‘Labels’ filter older canary pods
- In the ‘Settings’ section, check the checkbox labeled ‘Cascading’ to eliminate having orphaned resources
Finished Pipeline
Once You’ve completed the all of the steps your pipeline will look something like this: